Wednesday, June 22, 2011

What do these have in common...?


Curious? Check back soon for updates ^_~

Tuesday, June 21, 2011

Recap: Divas in the City 2

Last Thursday, LBT was one of many wonderful vendors at Divas in the City 2 hosted by two wonderful and beautiful ladies, Laura and Nikki from DivaGirlfitness and GraceCorps Studio respectively.

Here's a small set of pictures that I got to take.. I must admit though, I did take a few more but a lot of them did not turn out! Next time I'll make sure I bring a better lens (or learn to take better pictures in dark ^.^ )


Here are some new LBT headband pieces for everyday wear! Made with colourful elastic ribbon on the back for the fresh look in the summer.


They will be listed on LBT Etsy shop very soon!


Poster of all the sponsors including Acid city, Twobirds and Chiyopia


All the ladies looked so amazing!!!


A snapshot of Erin Bury of Sprouter speaking about using Social Media to grow your business network and your personal brand!


A wonderful neighbor and a fellow accessories designer!
Two lovely ladies with awesome fashion sense from Featherband.


Cupcakes to keep all the divas nice and sweet throughout the night ^.~
I didn't get a chance to try one, but everyone who tried said they were oh-so-good!


Thursday, June 16, 2011

Ooh, my cake is on Bonnie Gordon College website!


One of my cakes is the "face" for Advanced Cake Design CDD3 course page on Bonnie Gordon College of Confectionary Arts. How exciting!

This was made last year inspired by rococo style decor... and royal homes :D


I attended Bonnie Gordon College to be able to express my creativity into something pretty and edible. I met some really great people, and most of the staff were very helpful. The school recently became a college, so you can get certification and/or diploma program on Confectionary Arts! Did you know that so many of the alumni are doing so well in this industry and some are even teaching at the college. If you're curious, check out some of the staff/alumni here: J'adore Cakes Co. , Bobbette and Belle, Cake Opera Co., the Caketress to name a few. Yay Cakes!!!

Wednesday, June 15, 2011

DIY - Revamp your styrofoam: the Paper Mache way!


I've been wanting to do some paper mache-ing for a while now... and couldn't decide what I wanted to make. Then I remembered that I wanted some pretty head forms to display my headbands. I looked on ebay and on kajiji for vintage hat forms and they were quite pricy and shipping fee cost almost as much the item itself. So I decided to get styrofoam head forms and DO SOMETHING WITH IT. and that SOMETHING became my next paper mache project.

As a kid, I remember making a mask using paper mache with my mom. We used balloons as the foundation and after a few days of drying, we popped the balloon by using a needle. We would then cut the shape in half, cut out eyes and nose and attached elastic bands on each side to "hook" the mask onto our ears. What I do not remember is the smell of the mask or what type of face I drew on the mask... it must've been bad (the stink and the mask face) because I don't remember!

Anyways, it's so easy to find a recipe for doing paper mache online, but I thought I'd share mine combined with a little tip I found to "cinnamonize" your paper mache. Here it is...

Ingredients:

1. flour (I used all-purpose)

2. a pinch of ground cinnamon
(Optional, but it is quite pleasant if you like cinnamon. If you're okay with the raw flour smell, you can skip out on this!)

3. water (hot water helps with dissolving the flour, but luke-warm water is fine)

4. Newspaper strips

5. Table cover:
I would have to say this is crucial, but you can spread newspaper to cover your area, or garbage bag. I found this table cover from a dollar store.

6. Spray Paint

7. Plastic wrap (optional):
I wanted to wrap my styrofoam to protect it in case I have to reuse the head.

8. Latex gloves (optional):
So unnecessary, but I wanted to drink my coffee while doing it and
I didn't want to get my coffee cup dirty... so I used them.

9. Foundation/Base form:
You can use styrofoam like I did, but you can make your own shape using chicken wire and tape the first few layers to create the surface for paper mache, or simply use balloons.

Directions:

1. Cut the newspaper in strips: Depending on how large your form is, you can have longer or shorter strips. I cut mine about 2" x 10" but during the covering I cut the strips shorter to do finer areas like nose and mouth.

2. Cover the head with plastic wrap: Mine didn't stick to the head so easily. I'm sure it would've stuck better if the styrofoam head was wet, but I didn't want any surprises with green fuzzy moulds in few months when I decide to revamp it again. Luckily the bottom of the head had a small hole (for inserting a stand) so I gathered all the loose ends of the plastic wrap and inserted it in there.

3. "Glue" solution: Dissolve flour in water. I used 1 cup of flour with 2 cups of warm water. I actually added 1/3 cup of HOT water so that it would dissolve faster (got impatient). This mix was enough for 2 styrofoam heads that I planned to cover. 1 part flour to 2 part water should generally work well.

4. Dip your newspaper into the mix and run the strip between your index and middle finger (the fingers you use to say "PEACE"... or "VICTORY"), gently, to get rid of excess "glue" off the strips. If you start to see your strips getting pulpy, you might want to add more flour to make your glue less runny.

5. Cover: I did 2 layers, 30 min drying time in between each layer. The last layer was just newspaper strips without the glue because I noticed that there was excess amount of glue on the surface. If you did not want to paint on it and wanted to use prettier paper to cover the form, I think this would be the stage to do so. Either skip out on the glue if there's excess on the form already, or just put glue on one side of your pretty paper. You can always adjust the thickness of the covering... do more layers if you're not going to have a support inside your paper mache... do less if you're doing it for the sake of covering an object.


6. Let it dry: I let it sit on a clean sheet of newspaper in my living room for about 30 hours, but I anything between 20-24 hr should be good enough.

7. Paint!!: I used Krylon Indoor/Outdoor Spray Paint in Satin Pistachio. I used it because I bought it on sale a few months ago and I've been dying to use it on something. Also it was the only spray paint I had in my house and I wanted this to be budget friendly :)

I took the 2 styrofoam head forms outside and sprayed lightly. I used a few sheets of newspaper to cover the area. This spray paint dries to touch in 10 minutes and after 1 hr it's dry to handle. I did 3 coats, and left it to dry outside for 10 minutes in between. After the last coat I left them outside for a few hrs. Even though it was dry after 1 hr, I really didn't like the smell... so I left it out to air out a bit.


FINISHED!!!


showing off some new LBT products you'll see tomorrow at Divas in the City 2!


I used tulle to wrap the head because the they looked a bit too plain. I think in the future when I find time, I'll do some stenciling or some canvas wrap... I'll keep you posted :) Until then, here are my 2 green LBT helpers... Thanks for reading!


Monday, June 13, 2011

Divas in the City 2 - Want $5 off your ticket?

Hello LBT fans!

There's only 3 days left for the wonderful Divas in the City 2, and if you haven't purchased your tickets yet, you should very soon before it's sold out!

Oh, you want to hear some sweeter news though? Email me at loveandbeartrap@gmail.com and you can get your $5 off discount code for the show :)

Before you leave... check this lovely wedding shoot featured in Design sponge. Words cannot express how my heart feels when I read this blog... amazing pictures and inspirations.

Who doesn't love jeans...
this is a perfect match of oh so fem HOT PINK and some down to earth Jeans.
What do you think?


Im digging this colour palette... It's so fresh and sweet, I want to eat it all!!
even the flowers... and the necklace she's wearing...


Saturday, June 11, 2011

LBT will be at Divas in the City 2


When: June 16, 2011, 6 - 10 pm
Where: The Roosevelt Room, 328 Adelaide Street West, Toronto

Come out and listen to the featured speakers on Fashion, Career, Fitness, Beauty and Fitness, and while you're there, shop from LBT and other vendors! It'll be a great night of networking and hanging out with gals from GTA!


A bit off topic, but this deserves a post....

Nick and I just spent over an hour trying to look for this song... in our external hard drive space. I need to re-organize my music very soon...


The XX - Islands

AWESOME SONG!

.....and NOW off to bed!!!


Friday, June 10, 2011

Recap: LBT at Unionville Village Festival 2011


On Saturday June 4th, LBT was one of the vendors at the village market of Unionville Village Festival.

As expected, it rained in the morning. Not only did it rain, but it poured. I was so lucky to have two other wonderful vendors Peppercorn & Poppy and Stampin' up by Samantha Tam inside the tent with me to laugh about the water that was collecting on top of our tent, and using our one umbrella to empty it out... every 2 minutes... and getting wet during this process.. over and over again.


Despite the rain, the Festival Parade was still on at 10 am, and surprisingly there were enough people walking around the strip with their umbrellas and rainboots. Then at 1 pm, the sun came out to say hello, and within the next hour, everything dried up, and the streets were filled with people!


Abby, Peppercorn & Poppy's dog attracting many many people to bring them into our booth :)


Even though it was wet and cold the first half of the day, the last half was hot and BUSY!! It was a great turnout! Thank you to our friends and families who came to support and everyone else who dropped by our booth to say hello!


There's something that I always do at outdoor shows... and that's getting a corn to eat. Yummmmmmy!


LBT's next show is at Divas in the City2, a forum for female that feature speakers covering interesting topics including beauty, relationships, finance, careers, fashion and nutrition. You can purchase your tickets to this fabulous event here! LBT and other vendors will be there to satisfy your shopping urges between the lectures!

Thursday, June 9, 2011

More excited and nervous than how I would've felt if I saw Brad Pitt....

...is how I felt when I waited in Roy Thomson Hall to see Martha Stewart.


On Monday June 6th, Martha Stewart tweeted about the longest street in the world, at 1,896 km, THE Yonge street. Why? Because she was here in our town!

My hubby Nick surprised me with tickets to see Martha Stewart, the final speaker of 2011 Unique Lives & Experiences lecture series. Unique Lives & Experiences is an annual lecture series for women (but men are also welcome) creating an atmosphere to learn and be motivate from the speaker's personal experiences, followed by Q&A period for more personal interaction.


As I anxiously waited with my Ice Coffee (only $1 from McDonalds!!!-although I couldn't see any ice in that cup), this thought occurred to me.. "Never have I felt this excited and nervous about seeing anyone... including all my concert experiences". Let me tell you, I had a huge rush during the entire hour and a half she was on that stage.

She started off the fun lecture with her childhood stories, how she was the oldest daughter of 6 children and learned to garden with her father and cook and sew with her mother since she was very young. She studied history of Architecture and Economics, while she modelled to pay for her tuition. (She was indeed very tall, and for a lady who's turning 70 this year, she looked GREAT!) She got married at a young age, and worked as a stockbroker for a few years. While she was working, she was commissioned by a friend to cater and plan a wedding and she did that, and she did really well. Her reputation grew and she did more catering and taught her daughter's friends how to cook and bake. She then left the Wall Street and focused on her passion, which led to her current craft empire with over 90 publications.


Her entire talk was very interesting and entertaining, but here's a few that stuck to my mind.. in a nutshell.

*She published her first book when she was 40. It's never too late to start/change!
*5 months in prison was a horrible horrible experience, but she sewed, wrote, read, and did not stop working.
*the only regret she has in life is not having more than 1 child (she has one daughter Alexis Stewart)
*Her first horses and a set of her first vintage white fences were from Brantford Ontario!
*She always sat in front in classrooms because she believed (and still believes) that you learn more.
*She's friends with Bill Clinton and is neighbors with Ralph Lauren.
*Her property has 7 houses which includes her daughter's house and houses for her animals.
*She stenciled the floor of her first house in the Turkey Hill, Connecticut home.


Okay, so I hope that I didn't freak you out by sounding like I was stalking Martha Stewart. She was a wonderful speaker with a great humour, and I came out feeling inspired and motivated. I also realized that I am not that crazy wanting to make everything that I like instead of buying things premade, which isn't always the "easy way" of doing things.

Enjoying Stampin' Tom Collins at Luma after the show


I've always loved Martha Stewart, but I think I love her even more after seeing her on Monday...


A giant juicy hamburger and a mini hello kitty celebrates...


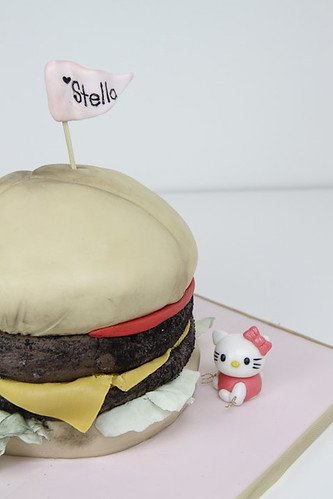
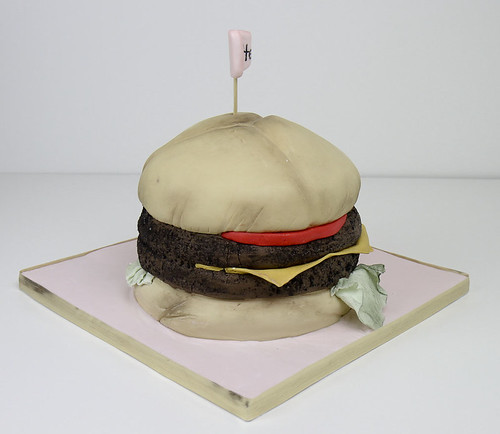
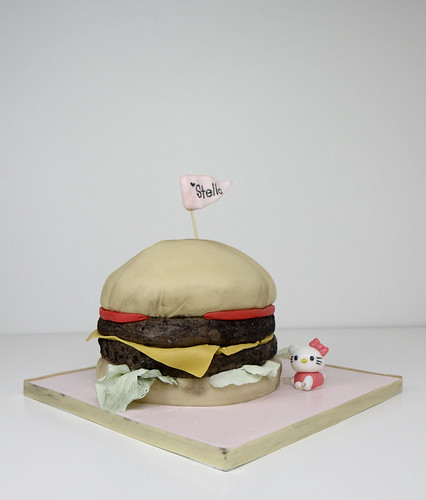
Earlier this week, a friend of mine and a dedicated foodie celebrated her birthday with this cake. My friend Stella is a BURGER GIRL, and when you read her well written blog (that's also updated every other day) Food Junkie Chronicles, you will soon realize her love for the juicy burgers. Look here, here, and here... oh, and don't forget to wipe your drool off your face after seeing her posts.

She's also a big fan of Hello Kitty, and if you ever meet this foodie in person, her iphone4 case will show you that. The face of that Hello Kitty and all the "bling" will definitely blow your mind!!!


This cake is actually a 5 layer of Red Velvet Cake disguised in a "Burger Suit"... and of course, the cream cheese filling between the red velvet layers. It was then all covered in vanilla butter cream and then the "burger suit" was put on. Everything here (except the board, the skewer for the name flag, and Hello Kitty's forks) are edible.


It was so much fun designing and making this cake for Stella!

Oh, and she put a picture of how the cake looked like inside, on her blog! Check out her other photos of the cake to see how giant it really was ^_^

Happy Birthday Stella!


Wednesday, June 1, 2011

L & A Wedding Cake

This past weekend, a wonderful couple tied a knot. I had the privilege to design their wedding cake, and enjoyed every second of it. It was a classic vanilla cake with hazelnut butter cream filling! Classy just like the bride :)

Congratulations L & A!!


Delicate cake top... front detail


Delicate cake top... back detail


All the pearls attached were hand rolled. No molds used. Over 4000 pearls.
yes.... four thousand.

and by the way, how cool and unique is their wedding colour palette!!!